Sante DVD Burning Server
Quick start guide
Copyright © 2026 Santesoft LTD , all rights reserved
Table of Contents
- Sante DVD Burning Server
- Overview
- Features and Benefits
- Automatic label printing on CD/DVD Robot Producers
- Minimum System Requirements
- Program Configuration Steps
- Main Window Modes
- The Database Panel
- The Network Panel
- Configure and use the DICOM network services (C-FIND/C-MOVE/C-GET/C-STORE/C-ECHO)
- Automatic CD/DVD burning and printing of received studies
- Creating Encrypted CD/DVD Media
- View the Database of the encrypted CD/DVD passwords
Overview
Sante DVD Burning Server can receive studies from medical scanners, PACS servers, and DICOM viewers and automatically burn and print them using EPSON and PRIMERA CD/DVD producers.
The program operates like a standard PACS server, storing all received studies in its database. In addition, it automatically sends the studies to the connected CD/DVD producer for burning and printing. If the automatic deletion option is enabled, the studies are deleted from the database after the CD/DVD has been successfully created.
If the CD/DVD creation fails, the studies remain in the database until the user resolves the issue with the producer (e.g., by refilling consumables) and the disc is successfully created, or until the user creates the CD/DVD manually and deletes the studies from the database.
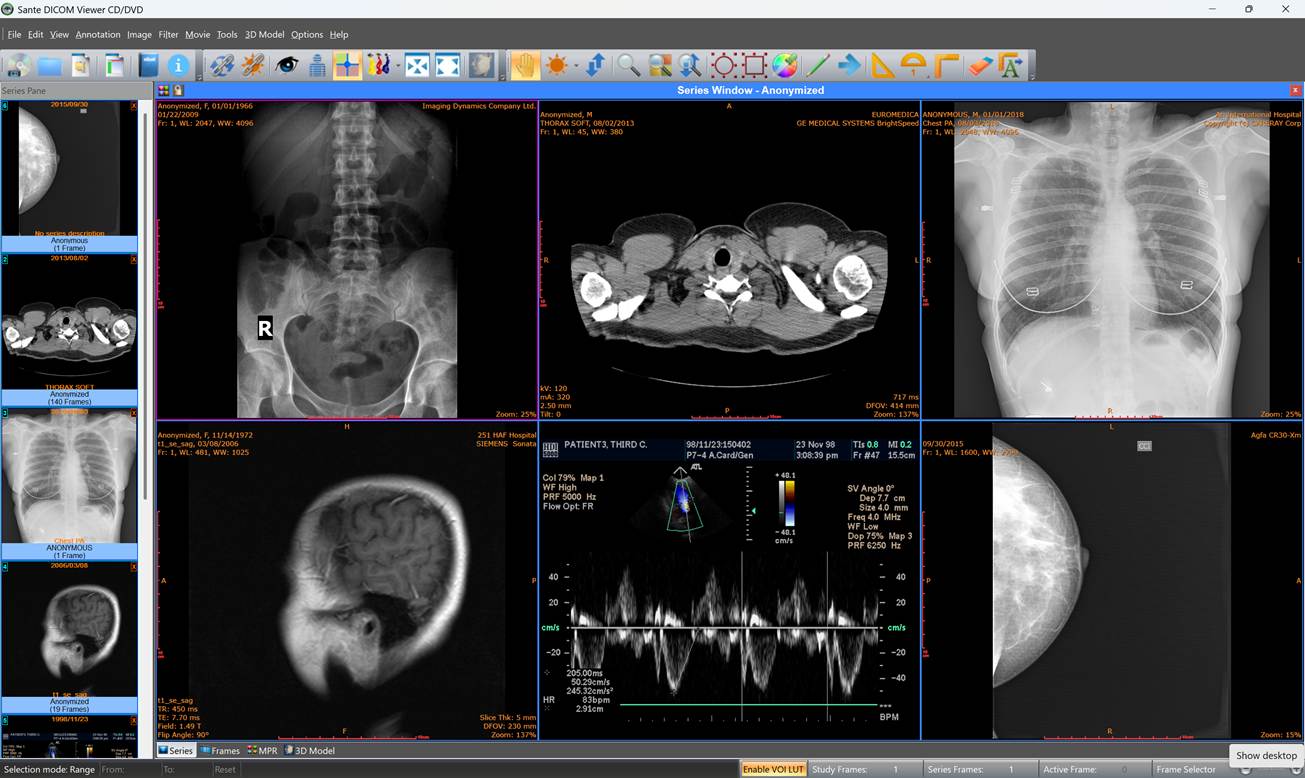
Each CD/DVD also includes a free DICOM viewer, allowing the patient and/or physician to easily view the patient's medical images directly from the disc.
The DICOM viewer of the CD/DVD (Sante DICOM Viewer CD/DVD)
Features and Benefits
- Sante DVD Burning Server can be configured like a standard PACS server and operates as a DICOM node. It communicates with other DICOM nodes and receives DICOM studies through standard DICOM network services (C-MOVE/C-STORE, C-GET/C-STORE).
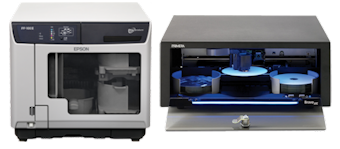
- It automatically creates CDs/DVDs from received DICOM studies and prints disc labels using EPSON and PRIMERA robotic disc publishers. CD/DVD creation can be performed either automatically or manually.
- It supports the creation of encrypted CD/DVD media using the SHA-256 encryption algorithm to protect patients' personal, medical, and other sensitive data.
- It also supports standard CD/DVD writers for manual disc creation.
- It keeps received studies in its database until the CD/DVD has been successfully created. Studies can optionally be deleted automatically after successful disc creation.
- It can include Sante DICOM Viewer Lite, our free DICOM viewer, on each CD/DVD, allowing patients and physicians to view the DICOM images directly from the disc. Alternatively, users can include a DICOM viewer of their choice.
- The server can run as a Windows service.
- It can store an unlimited number of patients and studies, limited only by the available hard disk space.
- It supports an unlimited number of connections to DICOM nodes.
- It supports all major character sets, including Latin, Chinese, Japanese, Korean, Cyrillic, Arabic, Greek, Turkish, and others.
- It is compatible with all DICOM modalities, including CT, MR, NM, US, XA, MG, CR, and others.
- The license is perpetual and never expires.
- Free updates and technical support are provided for the lifetime of the product.
- Compatible with 64-bit versions of Windows 11/10 and Windows Server 2019/2016.
- Easy to install, configure, and use, with a native Windows look and feel.
- A free, fully functional 90-day demo version is available.
Automatic Label Printing with CD/DVD Robotic Disc Publishers
The program can automatically or manually print CD/DVD labels using EPSON and PRIMERA robotic disc publishers. The labels can include the patient's name, patient ID, study date, study description, and other useful information.
Minimum System Requirements
- Windows 11/10 64-bit or Windows Server 2019/2016
- Intel Core i3 1.3 GHz or greater
- 4 GB memory or more
- Monitor with a resolution of 1366×768 or higher
- 250 MB of free hard disk space and additional disk space for the studies
Program Configuration Steps
1. Configure the AE Title and IP port of the server by selecting the menu command "Network → Network Server Setup" and following the instructions in the “DICOM Server Configuration” section of this document.
2. Configure the AE Title, IP address, and IP port of the other DICOM nodes (peers) on the network by selecting the menu command "Network → Network Peer Setup" and following the instructions in the “Configuration of the Other DICOM Nodes” section of this document.
3. Configure the CD/DVD producer by selecting the menu command "Options → CD/DVD Producer Setup" and following the instructions in the “CD/DVD Producer Setup” section of this document.
User Interface
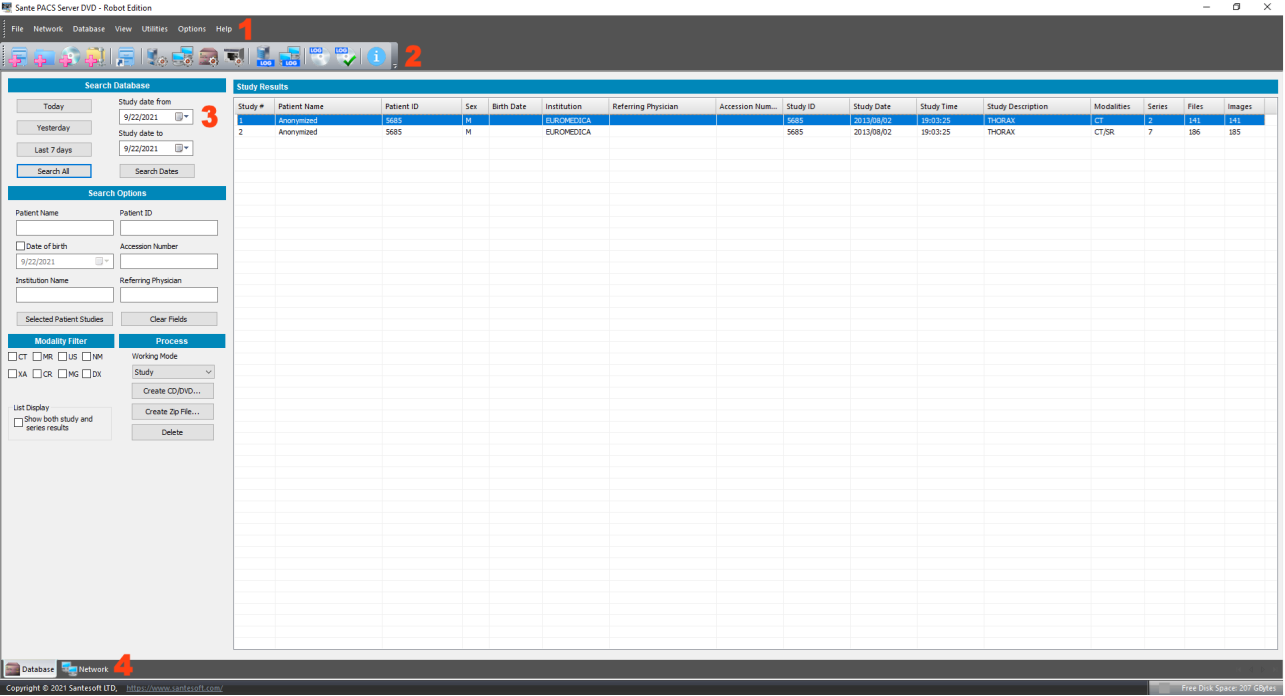
The user interface is divided into four parts:
1. The menu bar
2. The toolbars
3. The main window
4. The Database/Network Mode selection tab
1. Menu bar
The menu bar contains all program commands.
2. Toolbars
The toolbars provide shortcut buttons for the most useful commands of the program.
3. Main window
The main window can display two panels: the Database panel and the Network panel. Use the Database/Network selection tab (4).
4. Database/Network selection tab
If the tab "Database" is selected the main window displays the interface of the local database (Database Mode).
If the tab "Network" is selected the main window displays the interface that allows the user to query and retrieve series and studies from remote PACS servers (Network Mode).
Main Window Modes
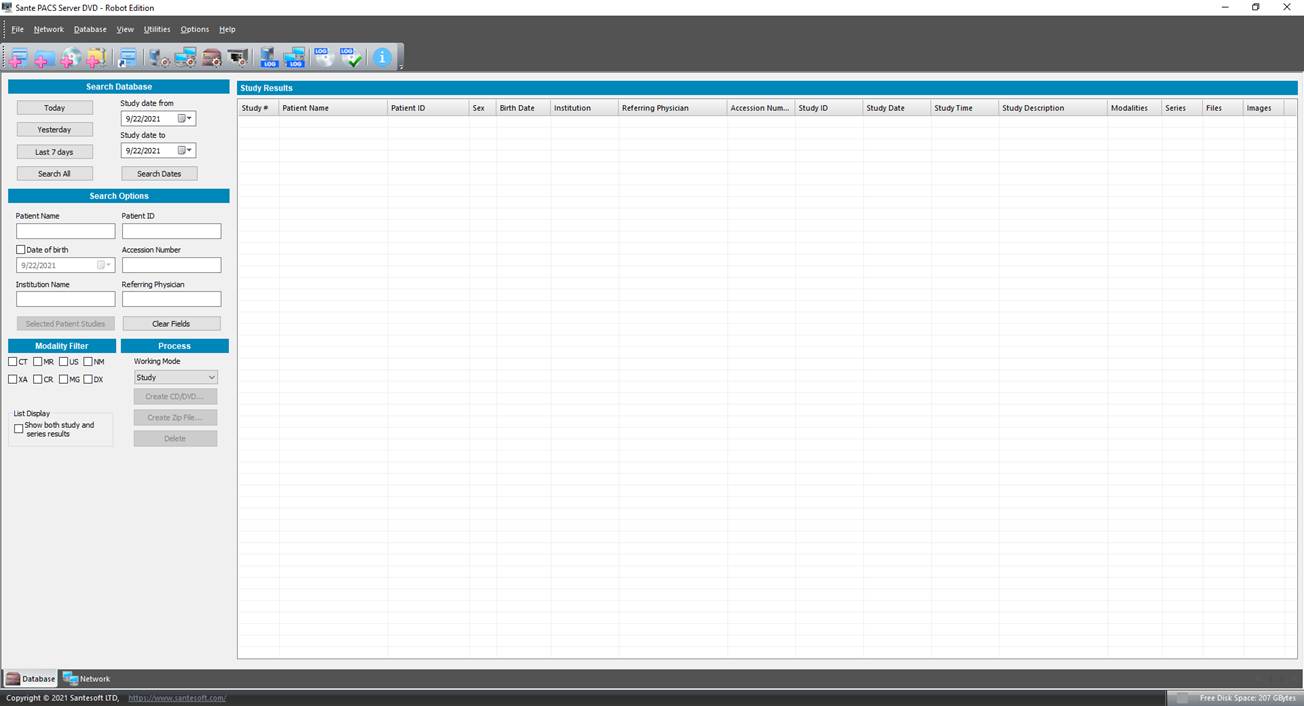
The Database Panel allows the user to query and retrieve series and studies from the local database.
The Network Panel allows the user to query and retrieve series and studies from remote PACS servers.
The Database Panel
The program has five buttons that allow the user to query the database.
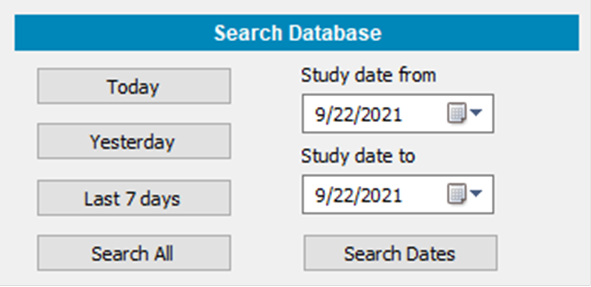
The "Today" button asks the server for the series/studies from the current date.
The "Yesterday" button asks the server for the series/studies from the previous day.
The "Last 7 Days" button asks the server for the series/studies of the last seven days.
The "Search All" button asks the server for all the series/studies.
The "Search Dates" button asks the server for all the series/studies within a user-defined date range.
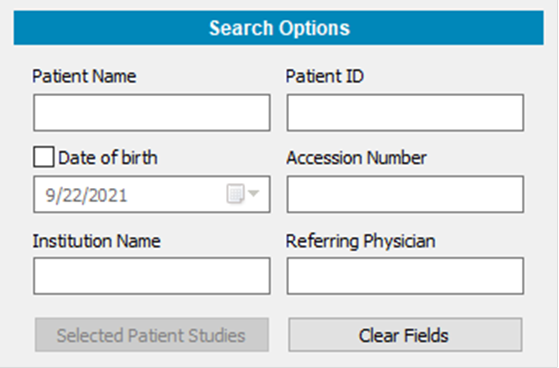
The user can fine-tune the query by adding more information about the desired results, like the patient's name, the patient ID etc.
The “Selected Patient Studies” button is enabled when the user has selected a study in the Study List, and it retrieves all the studies of the patient of the selected study.
The results of the queries are displayed in the Study and Series lists.
The user can choose whether to work with studies or series from the Working Mode combo box and create a DICOM CD/DVD or a Zip file.
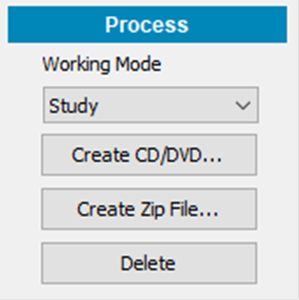
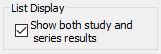
If the user wants the program to display both the study and series lists, the "Show Both Studies and Series Results" option must be enabled. Otherwise, the program displays only the results corresponding to the selected Working Mode, either studies or series.
The Network Panel
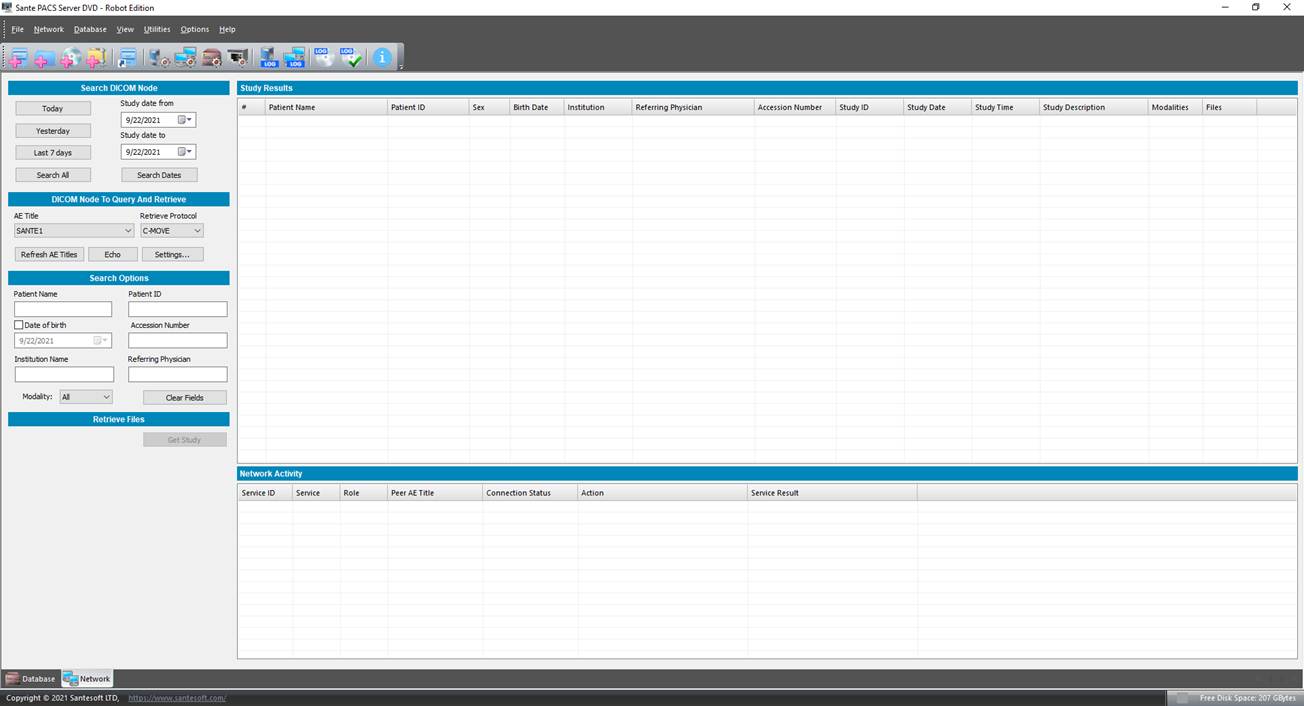
The "DICOM Node To Query And Retrieve" tools in the upper-left corner of the Network panel allow the user to select the DICOM server from which studies or series will be queried and retrieved. The available DICOM servers must first be configured as described in the Configuration section.
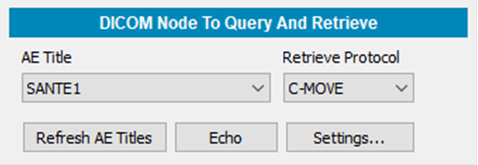
The "AE Title" combo box contains all configured DICOM servers and allows the user to select the server from which studies or series will be queried and retrieved.
The "Retrieve Protocol" combo box allows the user to select either C-MOVE or C-GET as the retrieval protocol.
The "Refresh AE Titles" button refreshes the contents of the "AE Title" combo box, for example, after new DICOM servers have been added through the Configuration procedure.
The "Echo" button allows the user to verify that the selected DICOM server is available and responding to DICOM network requests.
The "Settings" button allows the user to configure the DICOM network settings.
The program provides five buttons that allow the user to query the selected DICOM server.
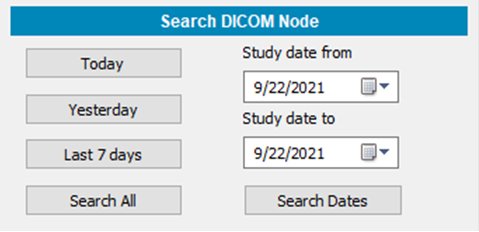
The "Today" button queries the server for studies/series from the current date.
The "Yesterday" button queries the server for studies/series from the previous date.
The "Last 7 Days" button queries the server for studies/series from the last seven days.
The "Search All" button queries the server for all available studies/series.
The "Search Dates" button queries the server for studies/series within a user-defined date range.
The user can further refine the query by specifying additional search criteria, such as patient name, patient ID, and other available information.
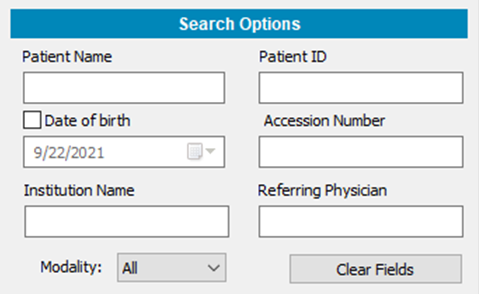
The query results are displayed in the Study and Series lists.
The user can retrieve the desired studies by selecting them from the list and clicking the "Get Study" button.
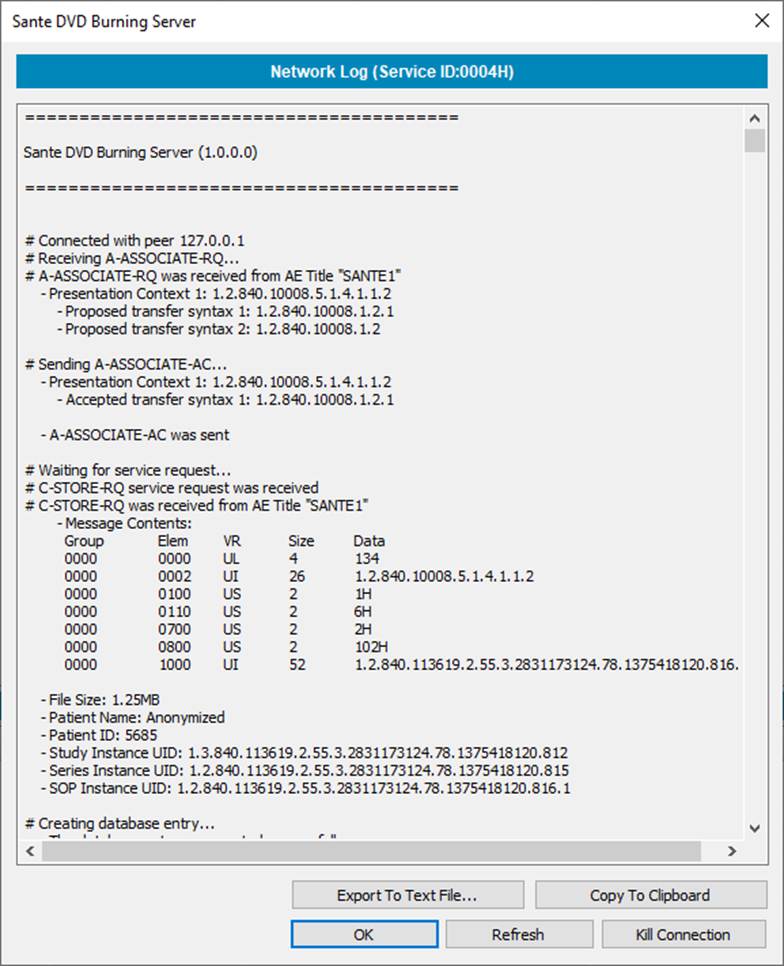
The "Network Log" list displays detailed information about the DICOM network activity.

The user can view the complete details of a specific network activity by selecting the corresponding row in the list. A dialog box appears, displaying detailed information about the selected activity.
Configure and Use the DICOM Network Services (C-FIND/C-MOVE/C-GET/C-STORE/C-ECHO)
Definitions
DICOM Services
The DICOM protocol consists of many different services, most of which involve transmission of data over a network. The program supports Store, Query/Retrieve, and Echo services (C-STORE/C-FIND/C-MOVE/C-ECHO SCU).
Store Service (C-STORE)
The DICOM Store service is used to send images or other persistent objects to a PACS or workstation.
Query/Retrieve Service (C-FIND/C-MOVE/C-GET)
This service enables a workstation to find lists of images or other objects and then retrieve them from a PACS system.
Echo Service (C-ECHO)
This service enables a workstation to verify the connection and the communication with another workstation or PACS system.
DICOM communication protocol
The communication protocol is an application protocol that uses TCP/IP to communicate between systems. DICOM files can be exchanged between two entities that can receive image and patient data in DICOM format.
Communication between DICOM nodes
Two DICOM nodes (workstations, PACS systems) can communicate if they know each other. That means, each system must know the AE Title, the IP address or hostname and the IP port of the other system.
AE Title
AE Title or AET is an abbreviation for Application Entity Title. An AE Title is used by an Application Entity (AE) to identify itself. AE Titles need to be locally unique and are typically managed by a system administrator. They are case-sensitive and 16 bytes long. They must be configured before establishing a DICOM connection.
IP address
An Internet Protocol (IP) address is a numerical identification (logical address) that is assigned to devices participating in a computer network utilizing the Internet Protocol for communication between its nodes. Although IP addresses are stored as binary numbers, they are often displayed in more human-readable notations, such as 192.168.100.1. An IP address can usually be resolved to a hostname via the local hosts file, or the Domain Name System (DNS) resolver, and can be used instead of the hostname.
Hostname
A hostname is a name assigned to a host computer and is resolved to an IP address via the local hosts file, or the Domain Name System (DNS) resolver. It can be used instead of an IP address.
Port
TCP/IP uses port numbers to identify sending and receiving application end-points on a host. Each side of a TCP connection has an associated 16-bit unsigned port number (1-65535) reserved by the sending or receiving application. Arriving TCP data packets are identified as belonging to a specific TCP connection by its sockets, that is, the combination of source host address, source port, destination host address, and destination port. Port numbers must be locally unique and are typically managed by a system administrator. The numbers 104 and 11112 are usually used as IP Ports in DICOM networking, but any number from 1 to 65535 can be used, provided it is unique on the host (node/PC) and is not already used by another application.
Firewall
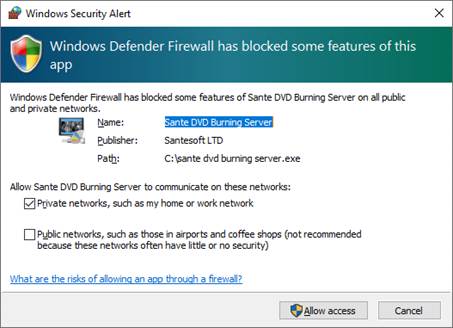
A firewall is software that inspects network traffic and allows or blocks it according to a set of rules. If a firewall is enabled on the computer, make sure the application is allowed through it.
DICOM Server Configuration
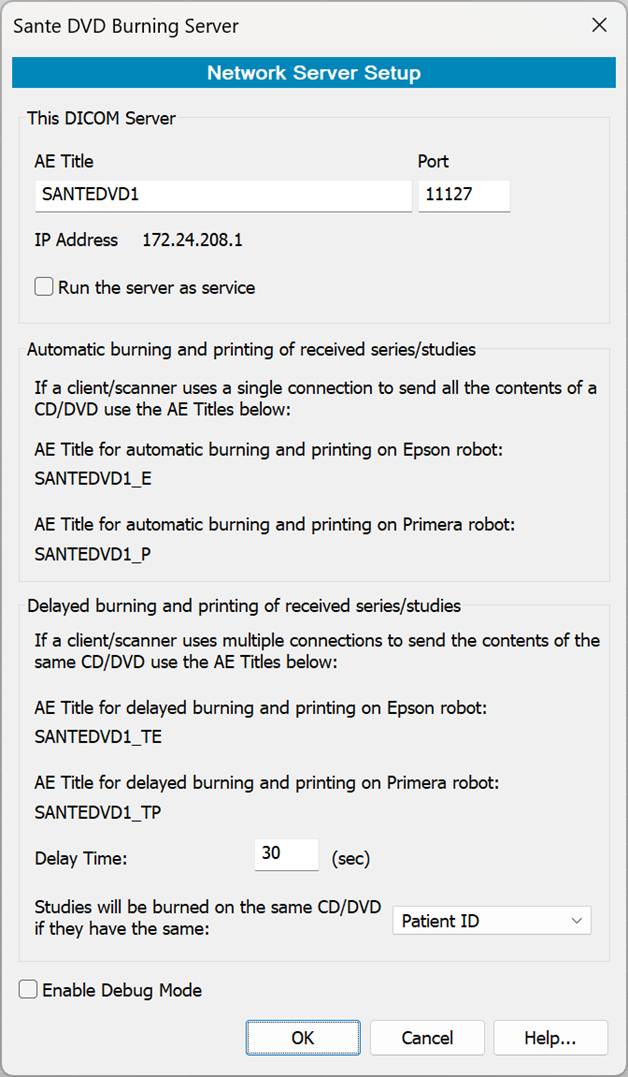
Select the menu command "Network → Network Server Setup". A dialog box appears, allowing you to configure the AE Title and IP port of Sante DVD Burning Server. This command requires administrator privileges.
"Delay Time"
Some devices send the series belonging to the same study using separate network connections. In this case, the program must wait until all series of the study have been received before sending them for CD/DVD creation. Otherwise, each series may be written to a separate CD/DVD. The "Delay Time" field allows the user to specify how long the program waits for additional series belonging to the same study or the same patient. The delay timer is restarted each time the reception of a new series belonging to the same study is completed.
Automatic burning and printing of received series/studies
A client application can use the configured AE Title of Sante DVD Burning Server with an "_E", "_ΤE", "_P" or "_ΤP" suffix. When either suffix is used, Sante DVD Burning Server stores the received studies/series in its database and automatically sends them to the corresponding robotic disc publisher for burning and printing.
- When the "_E" suffix is used, the received studies/series are automatically sent to an EPSON robotic disc publisher.
- When the "_TE" suffix is used, the received studies/series are automatically sent (with delay) to an EPSON robotic disc publisher.
- When the "_P" suffix is used, the received studies/series are automatically sent (with delay) to a PRIMERA robotic disc publisher.
- When the "_TP" suffix is used, the received studies/series are automatically sent to a PRIMERA robotic disc publisher.
"Run the Server as Service"
To run Sante DVD Burning Server as a Windows service, enable the "Run the Server as Service" checkbox.
Configuration of the other DICOM nodesConfiguration of Other DICOM Nodes
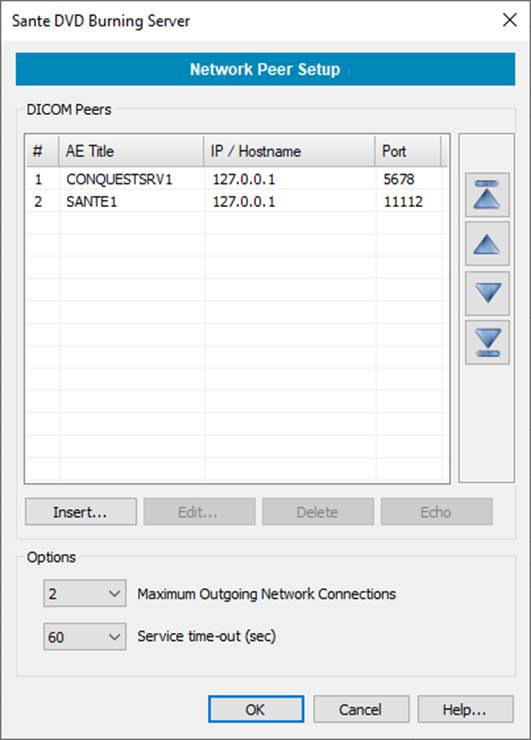
Select the menu command "Network → Network Peer Setup".
A dialog box appears, allowing you to configure the DICOM servers and clients available on the network.
This command requires administrator privileges.
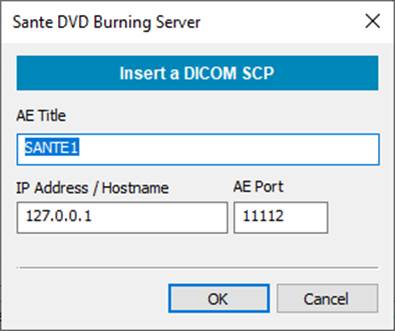
Insert/Edit a PACS System
Click the "Insert" or "Edit" button in the dialog box above. A new dialog box appears, allowing you to enter or modify the configuration settings of a PACS system.
Select a DICOM server from the list and click the "Echo" button to test the connection to the selected server. Select a DICOM server from the list and click the "Delete" button to remove the selected server from the configuration.
Maximum Outgoing Network Connections
When the program acts as a DICOM client and the user queries and retrieves studies/series from other DICOM servers, this option specifies the maximum number of simultaneous outgoing network connections. When the program acts as a DICOM server, the number of incoming network connections is unlimited.
Service Time-out
This option specifies how long the program waits for a response from a DICOM peer. If no response is received within the specified time, the program terminates the connection.
Configure the Other PACS Nodes on the Network
Sante DVD Burning Server is compatible with most DICOM-compliant PACS systems. Refer to the documentation of your PACS software for instructions on configuring DICOM Application Entities (AEs) and network connections.
Below are examples of how to configure two widely used free PACS servers, Conquest and dcm4chee. The configuration procedure is similar for most PACS systems.
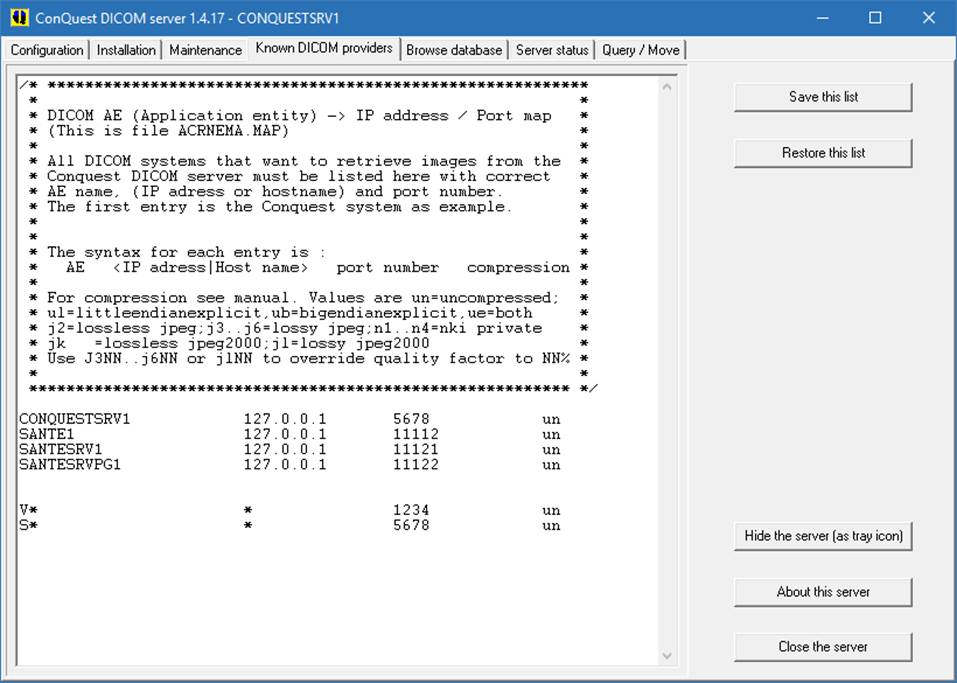
Conquest Configuration
Select the "Known DICOM Providers" tab and enter the AE Title, IP address, and IP port of Sante DVD Burning Server.
Click the "Save This List" button to save the configuration.
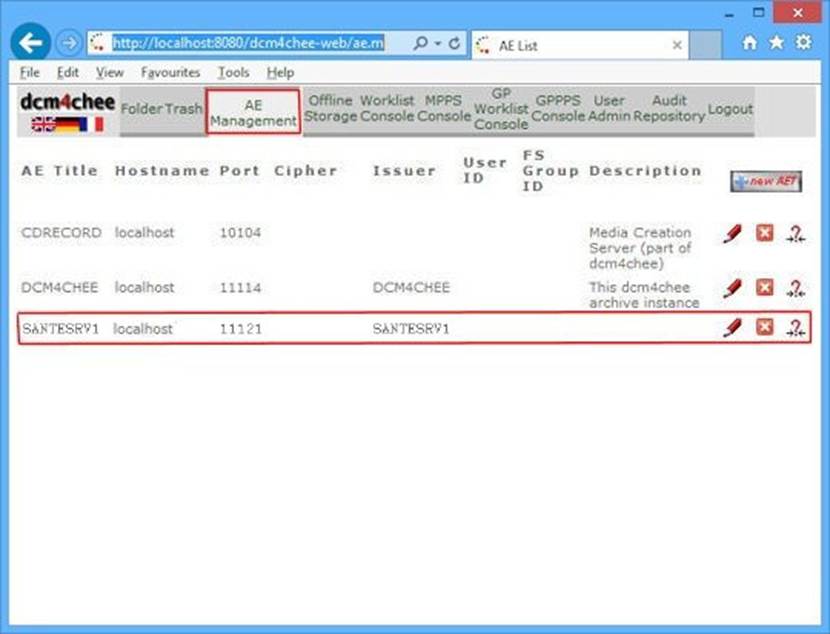
dcm4chee Configuration
Select the "AE Management" tab, click the "+ New AET" button, and enter the AE Title, IP address, and IP port of Sante DVD Burning Server.
Query and Retrieve (C-FIND/C-MOVE/C-GET services)
Select the "Network" tab from the mode selection control located in the lower-left corner of the main window.
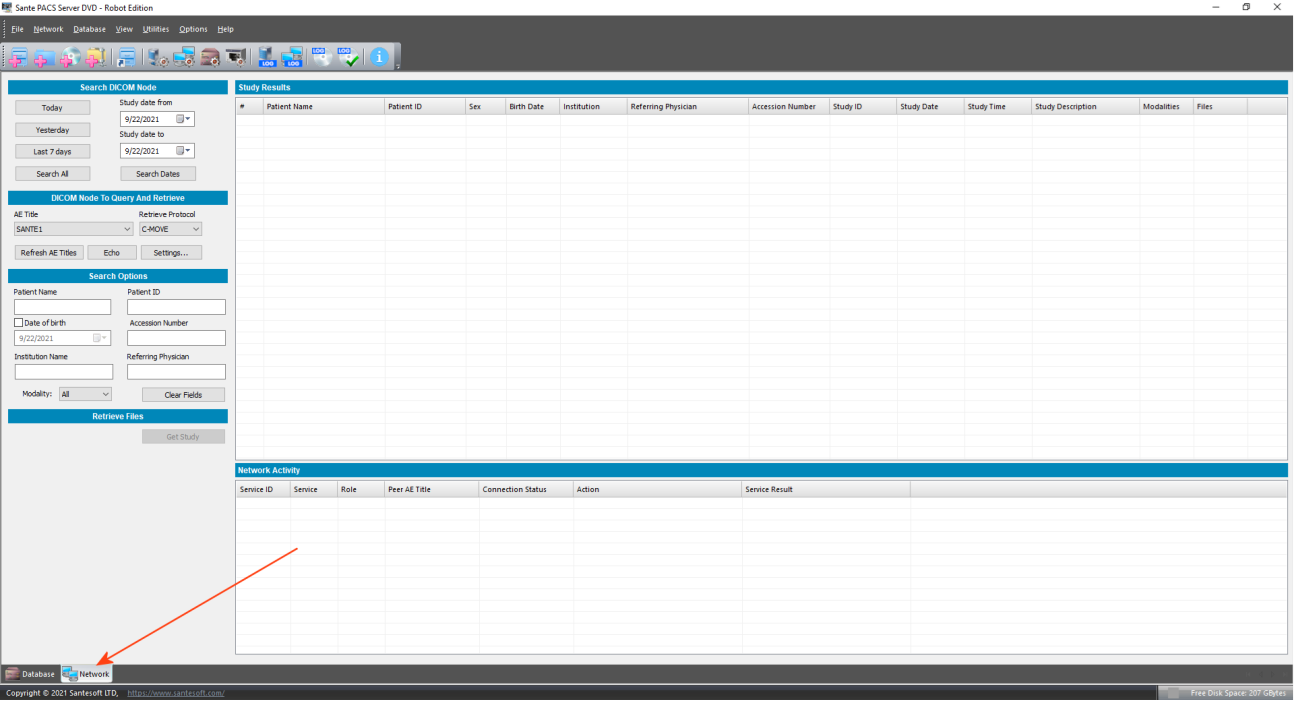
The "DICOM Node To Query And Retrieve" tools in the upper-left corner of the Network window allow the user to select the DICOM server from which studies/series will be queried and retrieved. The available DICOM servers must first be configured as described in the Configuration section.
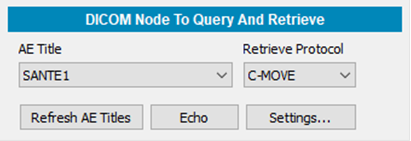
The "AE Title" combo box contains all configured DICOM servers and allows the user to select the server from which studies/series will be queried and retrieved.
The "Retrieve Protocol" combo box allows the user to select either C-MOVE or C-GET as the retrieval protocol.
The "Refresh AE Titles" button refreshes the contents of the "AE Title" combo box, for example, after new DICOM servers have been added through the Configuration procedure.
The "Echo" button allows the user to verify that the selected DICOM server is available and responding to DICOM network requests.
The "Settings" button allows the user to configure the DICOM network settings.
The program provides five buttons that allow the user to query the selected DICOM server.
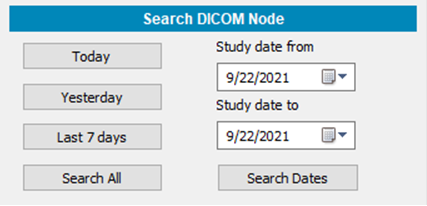
The "Today" button queries the server for studies/series from the current date.
The "Yesterday" button queries the server for studies/series from the previous date.
The "Last 7 Days" button queries the server for studies/series from the last seven days.
The "Search All" button queries the server for all available studies/series.
The "Search Dates" button queries the server for studies/series within a user-defined date range.
The user can further refine the query by specifying additional search criteria, such as patient name, patient ID, and other available information.
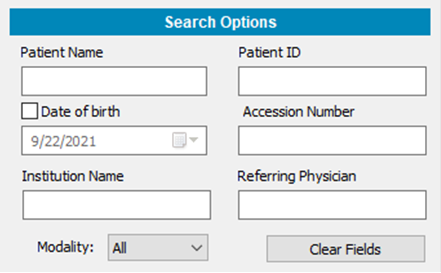
The query results are displayed in the Study and Series lists.
The user can retrieve the desired studies by selecting them from the list and clicking the "Get Study" button.
The "Network Log" list contains the log details of the network activity.

The user can view the complete details of a specific network activity by selecting the corresponding row in the list.
A dialog box appears, displaying detailed information about the selected activity.
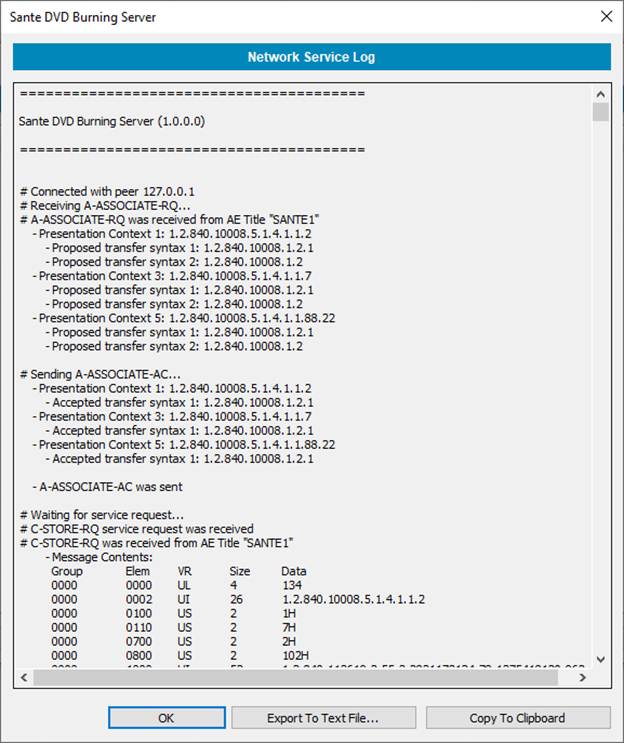
When a network service is completed, it is removed from this list.
Use the menu commands "Network → View Network (SCP) Report" and "Network → View Network (SCU) Report" to view detailed reports of completed network services.
Automatic CD/DVD burning and printing of received studiesAutomatic CD/DVD Burning and Printing of Received Studies
When Sante DVD Burning Server receives studies, it stores them on disk and can also send them automatically to EPSON or PRIMERA robotic disc publishers for CD/DVD burning and label printing.
For this purpose, it uses two additional AE Titles: one with the "_E" suffix appended to the original AE Title and one with the "_P" suffix. For example, If the defined AE Title is SANTEDVD1, the program creates the AE Titles SANTEDVD1_E and SANTEDVD1_P as well. These additional AE Titles are used for automatic CD/DVD burning and printing.
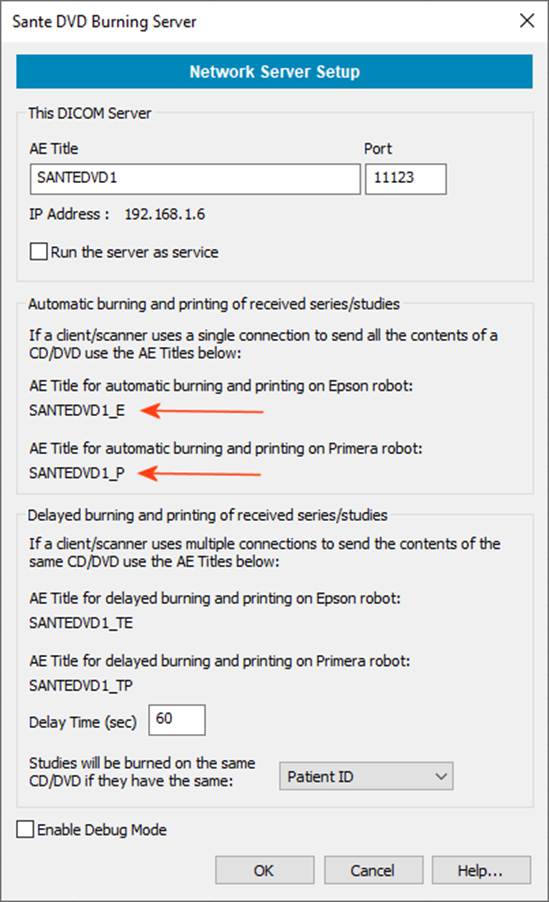
- If a client DICOM node (such as a CT/MR/US/DX scanner or DICOM workstation) uses the AE Title with the "_E" suffix, then Sante DVD Burning Server stores the received series/studies in the database and automatically sends them for printing and burning to an EPSON producer.
- If a client DICOM node (such as a CT/MR/US/DX scanner or DICOM workstation) uses the AE Title with the,"_P" suffix, Sante DVD Burning Server stores the received series/studies in the database and automatically sends them for burning and printing to an PRIMERA producer.
Delayed automatic CD/DVD burning and printing of received studiesDelayed Automatic CD/DVD Burning and Printing of Received Studies
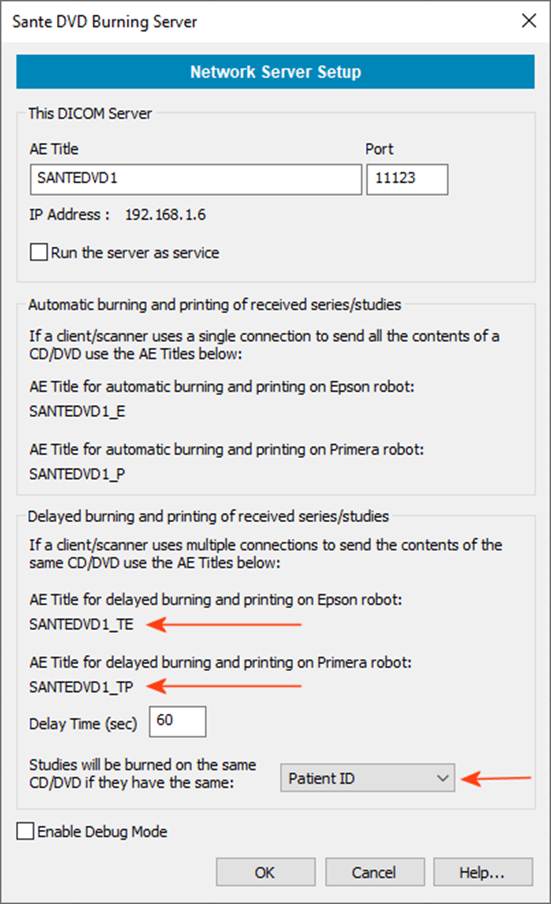
Some medical scanners use multiple connections to send an entire study (usually one connection per series of the study). In that case, the program by using the AE title with "_E" and "_P" suffixes described in the previous section, may create one CD/DVD per connection—that is, one CD/DVD for each series instead of a single CD/DVD containing the entire study.
In that case, the client DICOM node (a CT/MR/US/DX or other medical scanner, a DICOM workstation etc.) must use the AE Title with a "_TE" or "_TP" suffix. With these suffixes the program waits for a specific time before sending the received series of the study for printing and burning. If it receives a new series belonging to the delayed study, it waits again the specified time for the next series and so on. If no additional series is received within the specified time belonging to the delayed study, it sends the study for burning and printing.
The user specifies the delay time in the control Delay Time (sec) control of the dialog box below. The default value is 120 sec.
Default Producer
If a DICOM node does not use any of the suffixes _E, _P, _TE or _TP in the AE Title to select the destination producer, the program sends the studies received from this client to the default producer that has been specified in Default Producer combo box of the “Options →CD/DVD Producer Setup” command.

CD/DVD Producer Setup
Use the “Options →CD/DVD Producer Setup” command to configure the CD/DVD robotic disc publisher device. The program supports EPSON and PRIMERA devices.
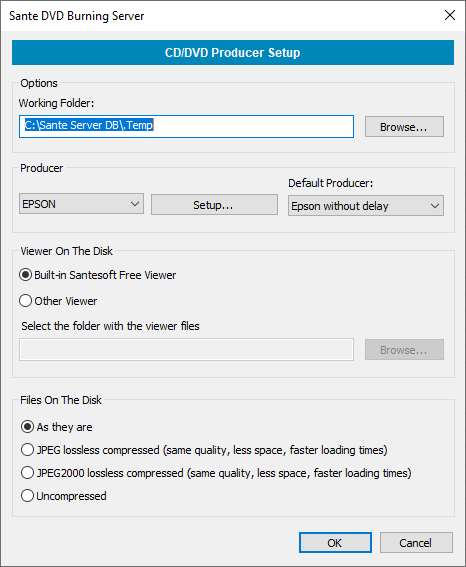
The dialog box above lets the user select the working folder and configure the EPSON/PRIMERA producers.
The program copies the files to be burned to the CD/DVD. The program deletes these temporary files after the CD/DVD has been created.
Producer
Select the desired producer and press the “Setup…” button to setup the producer.
Default Producer
When a DICOM node does not use any of the suffixes _E, _P, _TE or _TP in the AE Title to select the destination producer, the program sends the studies received from this client to the default producer that has been specified in this combo box.
EPSON Configuration
Epson driver and software setup
Download and install the TD Bridge and Total Disc Maker software from the EPSON website.
During setup, the user will be asked to specify the monitoring folder:
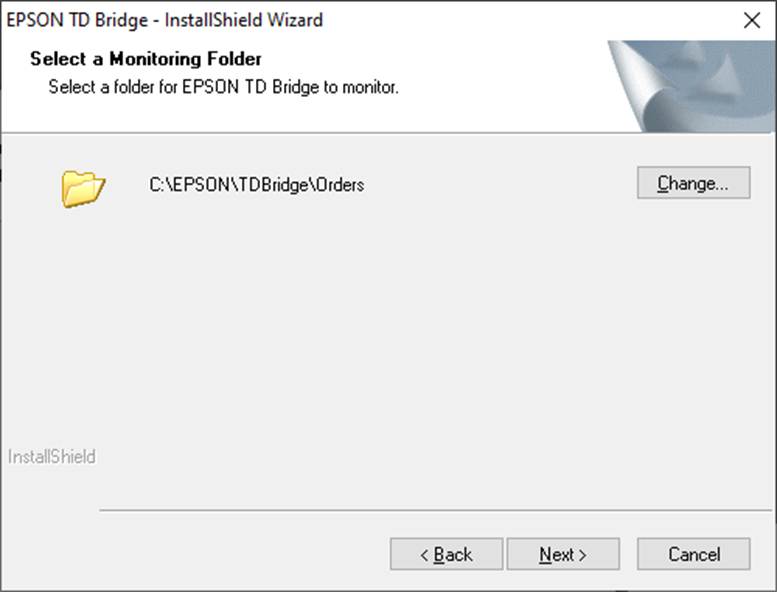
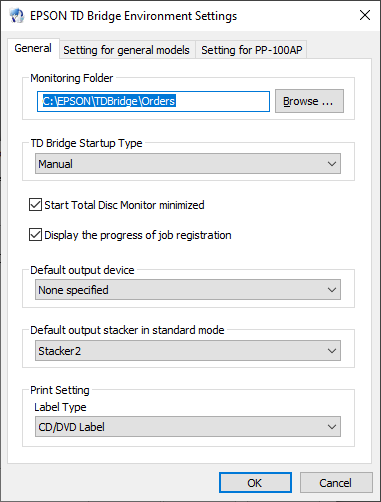
The monitoring folder can be changed later with the EPSON TD Bridge Environment Settings software:
ATTENTION!
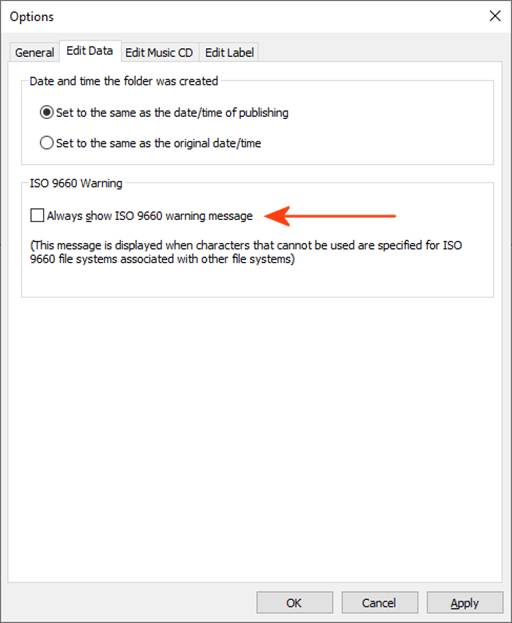
By default, the EPSON producer displays a warning message if the disc being burned uses the Joliet file system instead of the ISO 9660 Level 2 and the CD will not be burned.
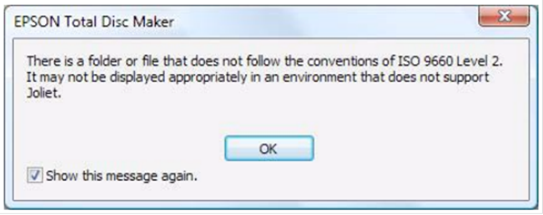
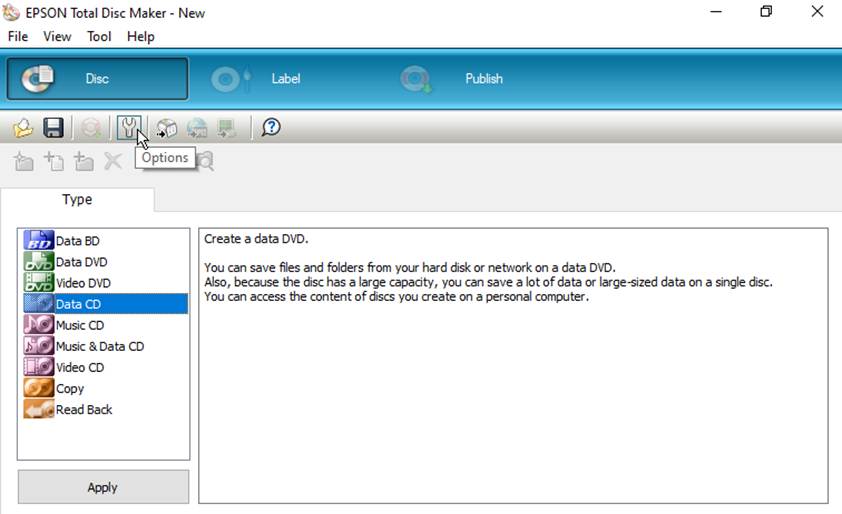
Sante DVD Burning Server uses the Joliet file system for CDs, thus the user must disable this warning. To do so, run the “EPSON Total Disk Maker”, select the “Data CD” disk type and press the “Options” button.
Uncheck the checkbox “Always show 9660 warning message”
Sante DVD Burning Server setup for Epson producers
Select the menu command “Options →CD/DVD Producer Setup”, select the “EPSON” producer and press the “Setup…” button.

The following dialog box appears and lets the user setup the Epson producer.
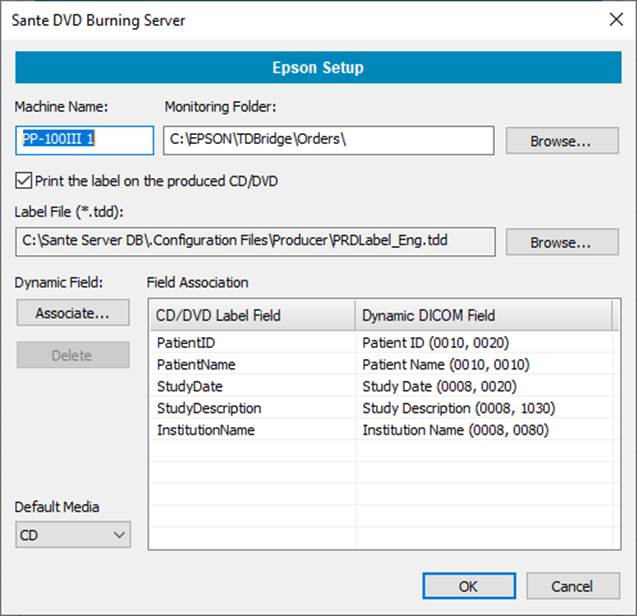
Machine name
This is the name used to communicate with the EPSON device. It must be the name of the model of the EPSON producer.
Monitoring Folder
Specifies the folder where the program will copy the job file to be processed by the Epson TD Bridge software.
Label File
Specifies the path of the label project (TDD) file.
The label project file defines the label fields (patient name, study date, institution name, etc.) that will be printed on the disc surface.
This information is read from the DICOM files.
Dynamic Field / Field Association
Allows the user to define associations between a label field and a dynamic field that is read from the DICOM files.
The "Associate..." button creates an association between a "CD Label Field" and a "Dynamic Field" from the drop-down list of basic DICOM fields.
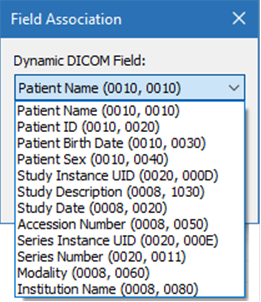
The "Delete" button deletes an association.
PRIMERA Configuration
Primera driver and software setup
Download and install the driver of the producer from the site of PRIMERA, and select the Shared (monitoring folder).
Sante DVD Burning Server setup for Primera producers
Select the menu command “Options →CD/DVD Producer Setup”, select the “PRIMERA” producer and press the “Setup..” button.

The following dialog box appears and lets the user setup the Primera producer.
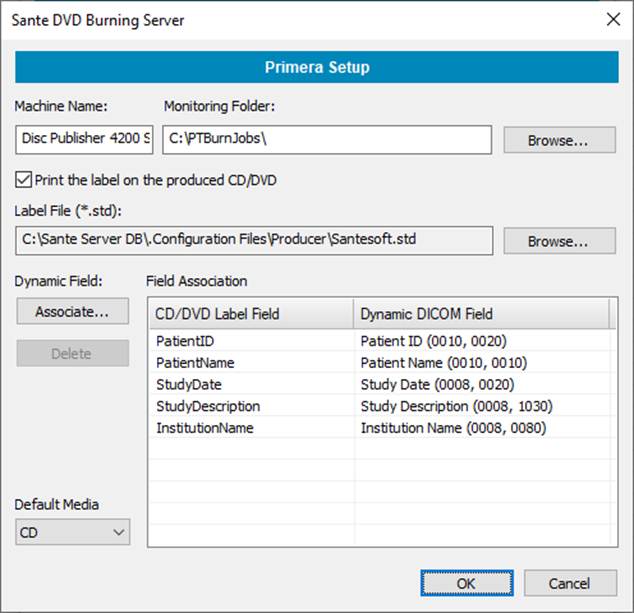
Machine name
This is the name used to communicate with the PRIMERA device. It must be the name of the model of the PRIMERA producer.
Monitoring Folder
Specifies the folder where the program will copy the job file to be processed by the Primera PTBurn software.
Label File
Specifies the path of the label project (STD) file.
The label project file defines the label fields (patient name, study date, institution name, etc.) that will be printed on the disc surface.
This information is read from the DICOM files.
Dynamic Field / Field Association
Allows the user to define associations between a label field and a dynamic field that is read from the DICOM files.
The "Associate..." button creates an association between a "CD Label Field" and a "Dynamic Field" from the drop-down list of basic DICOM fields.
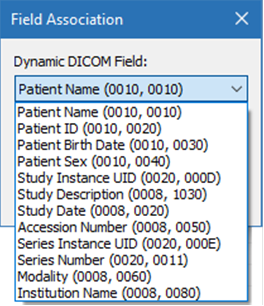
The "Delete" button deletes an association.
Example with Epson Disk Publisher
|
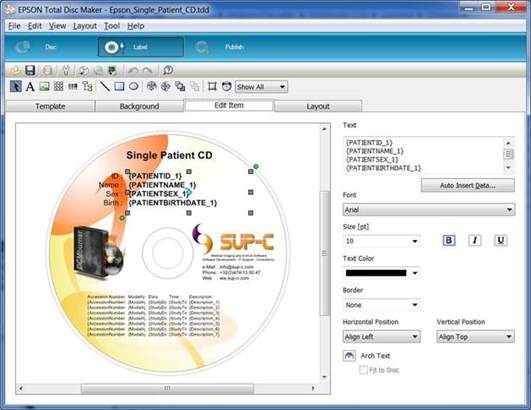
Using Epson Total Disc Maker, create a label file (*.tdd) that describes the layout of the DVD labels. |
|
|
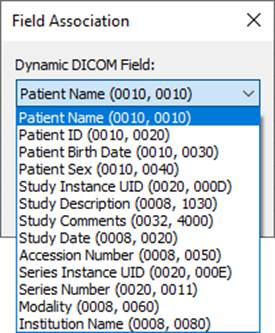
Then you must associate a label name (e.g. PATIENTNAME_1) with a DICOM field (e.g. 0010,0010 Patient Name). To do that, select the menu command "Options→ CD/DVD Producer Setup". |
|
|
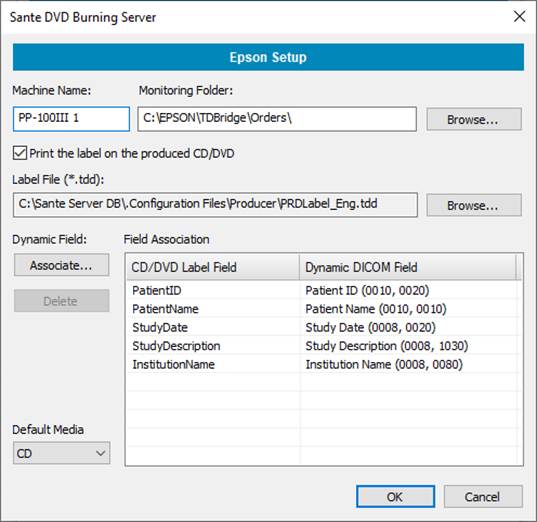
Select the “EPSON” as producer and press the “Setup…” button. In the following dialog box: |
|
|
The "Associate..." button creates an association between a "CD Label Field" and a "Dynamic Field" of the drop-down list that contains basic DICOM fields. |
|

Example with Primera Disk Publisher
|
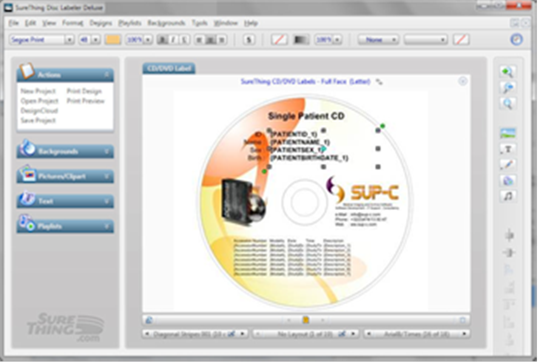
Using the Primera software, create a label file (*.std) that describes the layout of the DVD labels. |
|
|
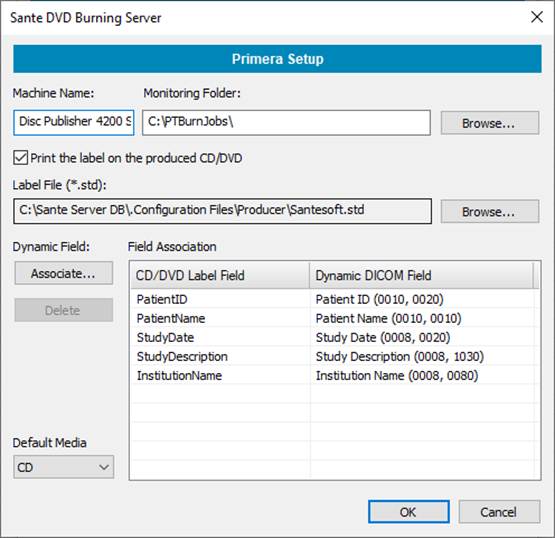
Then you must associate a label name (e.g. PATIENTNAME_1) with a DICOM field (e.g. 0010,0010 Patient Name). To do that, select the menu command "Options→ CD/DVD Producer Setup". |
|
|
Select the “PRIMERA” as producer and press the “Setup…” button. In the following dialog box: |
|
|
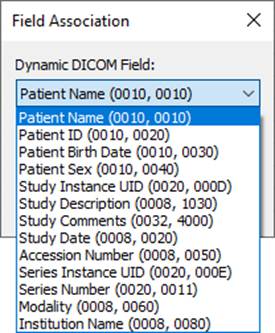
The "Associate..." button creates an association between a "CD Label Field" and a "Dynamic Field" of the drop-down list that contains basic DICOM fields. |
|

Report of active CD/DVD Producer jobs
Select the menu command “Report →Active CD/DVD Producer Jobs” to review the status of the active jobs of the producer.
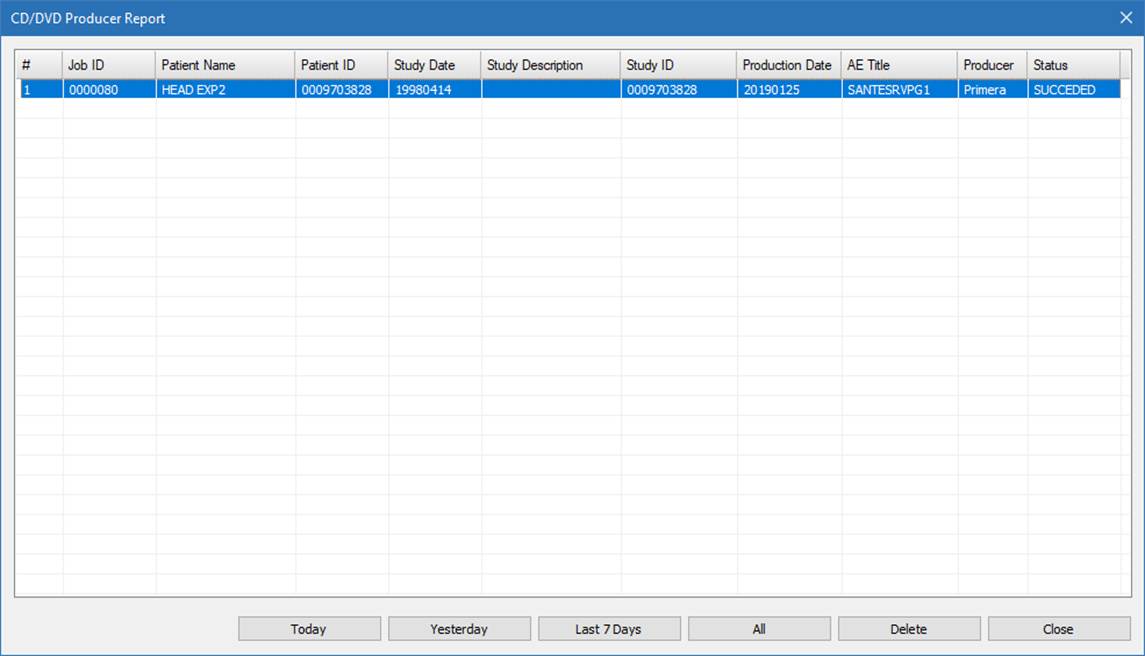
Report of finished CD/DVD Producer jobs
Select the menu command “Report → CD/DVD Producer Jobs” to review completed producer jobs.
Creating Encrypted CD/DVD Media
The program can create encrypted (SHA-256) CD/DVD media containing the patient's files, to protect personal, medical, and other sensitive data.
Enable Encryption
The user can enable this feature by selecting the “Options →CD/DVD Encryption Setup” menu command. Once enabled, all CD/DVD discs created by the program, regardless of the method used to create them, will be encrypted.
When encryption is enabled, the generated CD/DVD media are encrypted (SHA-256) and password protected to ensure secure distribution of patient data. The program can store the generated passwords locally and optionally send them by email to an authorized recipient (for example, the hospital or clinic secretary), so the passwords can later be delivered to the patient using the most appropriate communication method.
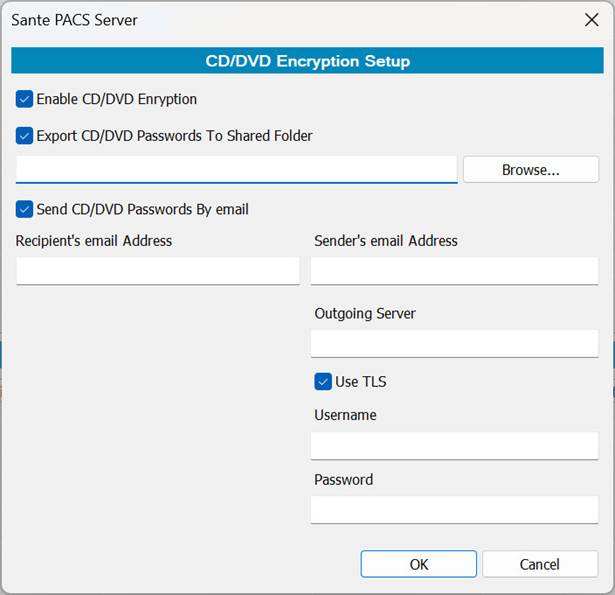
Enable CD/DVD Encryption
Enables password protection for all newly created CD/DVD media. When this option is enabled, the exported media cannot be opened without the correct password.
Export CD/DVD Passwords To Shared Folder
Automatically exports the generated passwords to a local or shared folder. Use the Browse... button to select the destination folder.
This feature is useful when passwords must be centrally collected, archived, or accessed by authorized personnel on the local network.
Send CD/DVD Passwords By Email
Automatically sends the generated passwords by email after the CD/DVD creation process is completed.
This option is typically used to send the passwords to the hospital or clinic secretary, who can then communicate the password to the patient separately.
Recipient's Email Address
The email address that will receive the generated passwords.
Sender's Email Address
The email address used as the sender of the outgoing message.
Outgoing Server
The SMTP server used for sending email messages.
Example:
smtp.gmail.com
mail.yourdomain.com
Use TLS
Enables secure encrypted communication with the SMTP server.
It is strongly recommended to keep this option enabled whenever the mail server supports TLS.
Username
The username used to authenticate with the SMTP server.
Password
The password associated with the SMTP account.
Notes
- The generated passwords can be stored in the internal database, in a local/shared folder, and/or sent by email.
- The recipient of the password should be informed through a communication channel different from the physical CD/DVD delivery whenever possible.
- If the email settings are incorrect, the password email delivery may fail even though the CD/DVD is successfully created.
- Some SMTP providers may require TLS/SSL enabled, authentication, application-specific passwords, or firewall/network permissions.
View the Encrypted CD/DVD Password Database
Use the menu command “Report → CD/DVD Passwords” to view, search, manage, and export the passwords generated for encrypted CD/DVD media.
Each record in the database corresponds to one encrypted CD/DVD production and contains the associated patient information, production details, serial number, and generated password. This database allows authorized personnel to retrieve passwords later and securely communicate them to patients when needed.
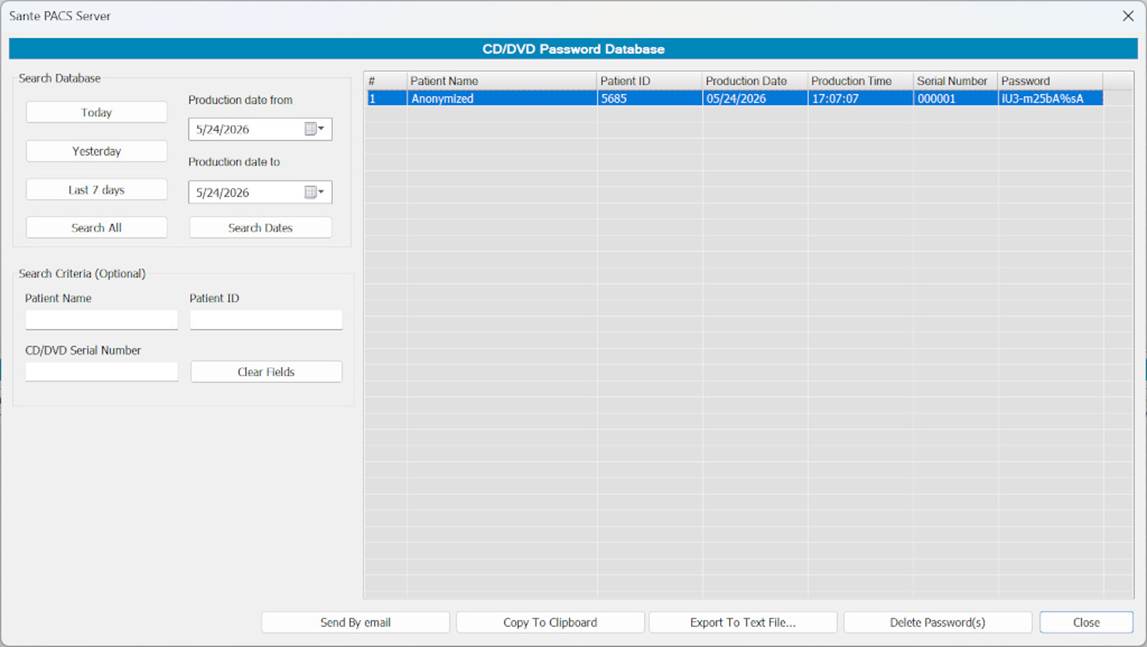
Search Database
The left panel provides quick search options for locating password records.
Today
Displays all passwords generated today.
Yesterday
Displays all passwords generated yesterday.
Last 7 days
Displays all passwords generated during the last seven days.
Search All
Displays all records stored in the database.
Production date from
Specifies the start date of the search range.
Production date to
Specifies the end date of the search range.
Search Dates
Searches for records created within the selected date range.
Search Criteria (Optional)
Additional filters can be used to narrow the search results.
Patient Name
Searches records by patient name.
Patient ID
Searches records by patient ID.
CD/DVD Serial Number
Searches records by the serial number assigned to the CD/DVD media.
Clear Fields
Clears all search criteria fields.
Password Database Table
The table displays all matching password records.
Internal record number
The internal record number associated with the password record.
Patient Name
The patient name associated with the encrypted CD/DVD.
Patient ID
The patient identification number.
Production Date
The date the CD/DVD was created.
Production Time
The time the CD/DVD was created.
Serial Number
The serial number assigned to the produced CD/DVD.
Password
The generated encryption password required to access the CD/DVD contents.
Commands
Send by Email
Sends the selected password record(s) by email using the configured email settings.
This function can be used to resend passwords to authorized personnel if necessary.
Copy to Clipboard
Copies the selected password(s) to the Windows clipboard.
Export to Text File...
Exports the selected password records to a text file.
This option is useful for archiving, printing, secure offline storage, or transferring records to another system.
Delete Password(s)
Deletes the selected password record(s) from the database.
Use this function carefully. Deleted records cannot be recovered.
Close
Closes the dialog.
Notes
- Access to this database should be restricted to authorized personnel only.
- Passwords should be communicated securely and according to the organization’s privacy and security policies.
- It is recommended to avoid sending both the encrypted media and the password through the same communication channel whenever possible.
- The database may contain sensitive patient-related information and should be protected accordingly.